Intro to the Linux Command Line
Working in the Shell
So, you need to work in a command line interface (CLI) in a linux shell (a program that allows you to run commands on a Linux server or your Mac). How can you gain confidence and know what you’re doing? If you’ve generally always used a graphical user interface / GUI (like Windows or OSX, where you point and click to compute), moving into a CLI approach can be intimidating.
This article will get you started using a linux command line, using bash, with ease. Want to learn more? Software Carpentry has a great series of educational resources in their course Shell Novice, which goes into greater detail than I can here. It’ll take most of a day to get through that course, but you’ll be well equipped to move forward with all sort of command line skills.
Vocabulary
First, a bit of vocabulary. I think that half the battle in computing is knowing what to Google, and knowing what things are called will empower you to find answers when you get stuck.
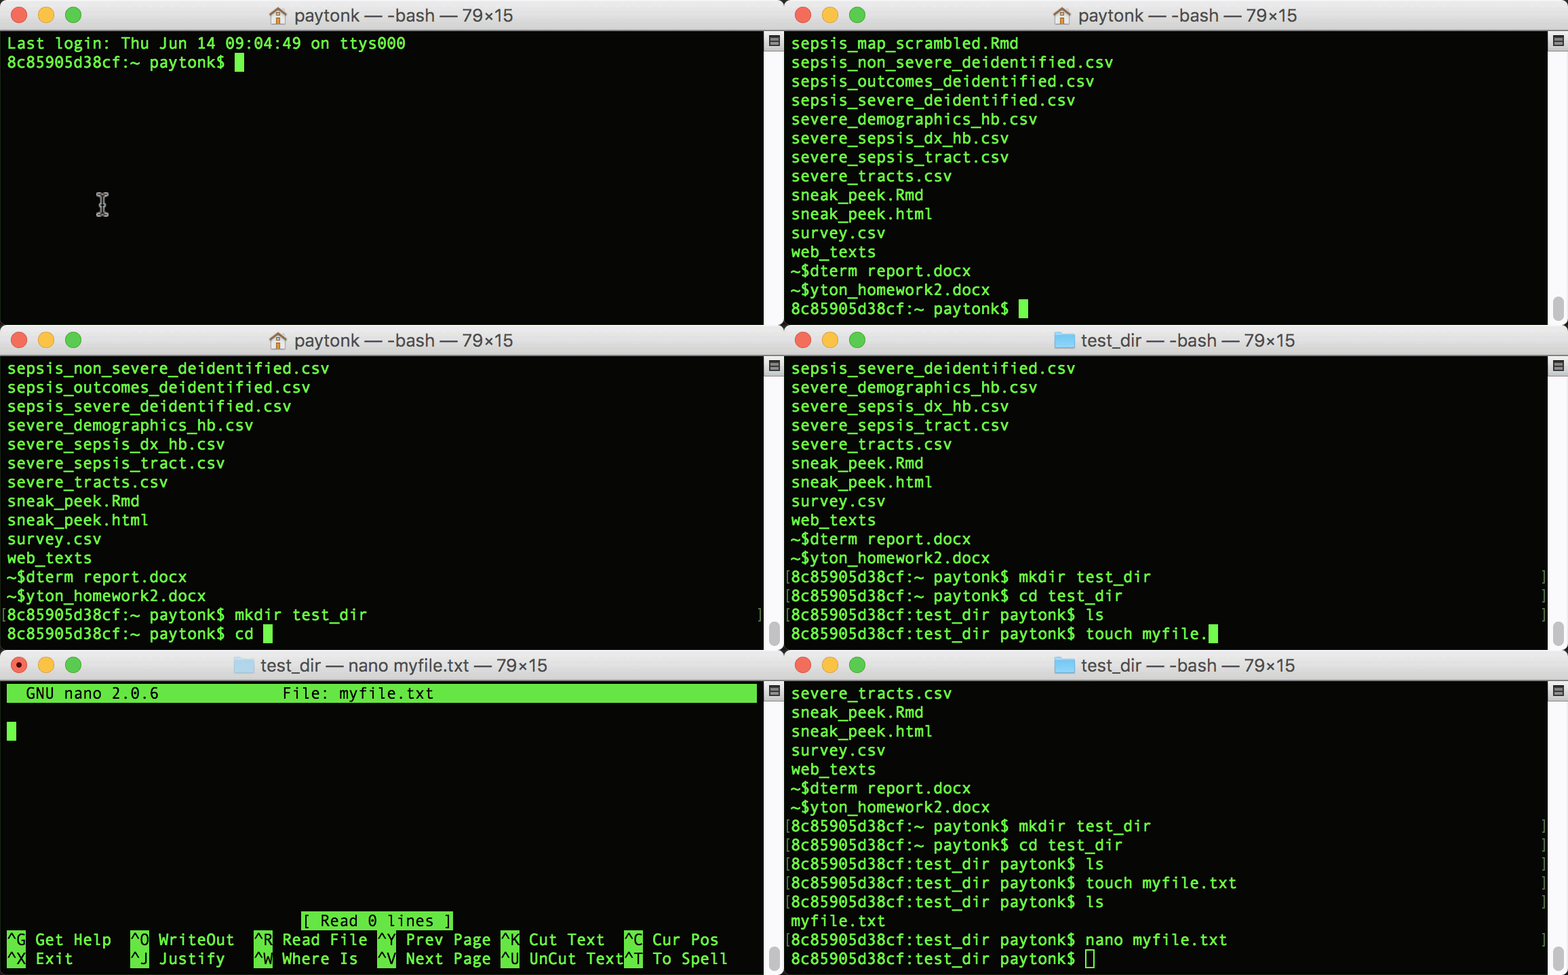
- A “REPL” is a read, evaluate, print loop. It allows you to work interactively with a computer system, so that you issue a command, the computer executes the command, gives output to your screen, and awaits further instruction. If you’ve used the console in R (perhaps in RStudio), or a Jupyter Notebook, you’ve used a REPL. The Linux shell is an example of a REPL.

In the above example, I ask the computer where I am (pwd), list the files in my current directory (ls), make a new directory (mkdir), move into that directory (cd), make a new blank file (touch), and look into the file (nano). After each command I issue, the computer (in this case my MacBook Pro, which has a linux-like command line interface) reads and evaluates the command, prints any results to screen as needed, and loops back to await more instruction.
-
“bash” is short for Bourne shell, named after the creator of the early shell programming REPL. You will notice that the title bar of the gif above contains the word “bash”. In addition to using bash as a REPL (like I did above), which is also called using a command line interface, I can also write a “bash script”, which is a file that contains multiple commands, one per line, which can be run as a whole, instead of my having to do each one and wait for the REPL to give me another prompt to issue the next command. Bash scripting is handy when you have a series of commands you know you’ll run regularly.
-
ssh, or “secure shell”, allows you to log in to a remote computer and use the bash shell there, using encryption to make sure that the commands you issue, which may have to travel across a large network, are kept private and can’t be read by anyone “listening in”. For example, you might have to issue commands to a linux server that’s in CHOP’s data center, in order to do things like edit files (maybe change some web page materials), copy or move things (back up some important genomic data), search (find files in a given directory that contain a certain pattern of text) or interact with software (use some analysis or database software to work with data stored on the server).
-
A “terminal emulator” is a program that makes it look as though you’re entering commands into a computer that’s right there in front of you, even though it’s remote. The “terminal emulator” is the software program that lives on your local device (your Windows or Mac workstation) that allows you to communicate with a remote server using ssh. Popular terminal emulators include Mac’s Terminal and PuTTY, a Windows program.
Getting Started – Step 1
The best way to learn the Linux command line is by starting! If you have a Mac, this is easy, because the Mac command line looks and feels like Linux. If you have Windows, you should get access to the remote server you’re supposed to be working with and start there.
Connecting to a remote machine? You should have a username and password to access that remote machine. If it’s a CHOP machine, that will be your normal Active Directory / AD username and password, the ones you use to log in to your computer or check your email. Depending on what terminal emulator you use, you may be able to set this up in an account, or you might have to type it in as you go.
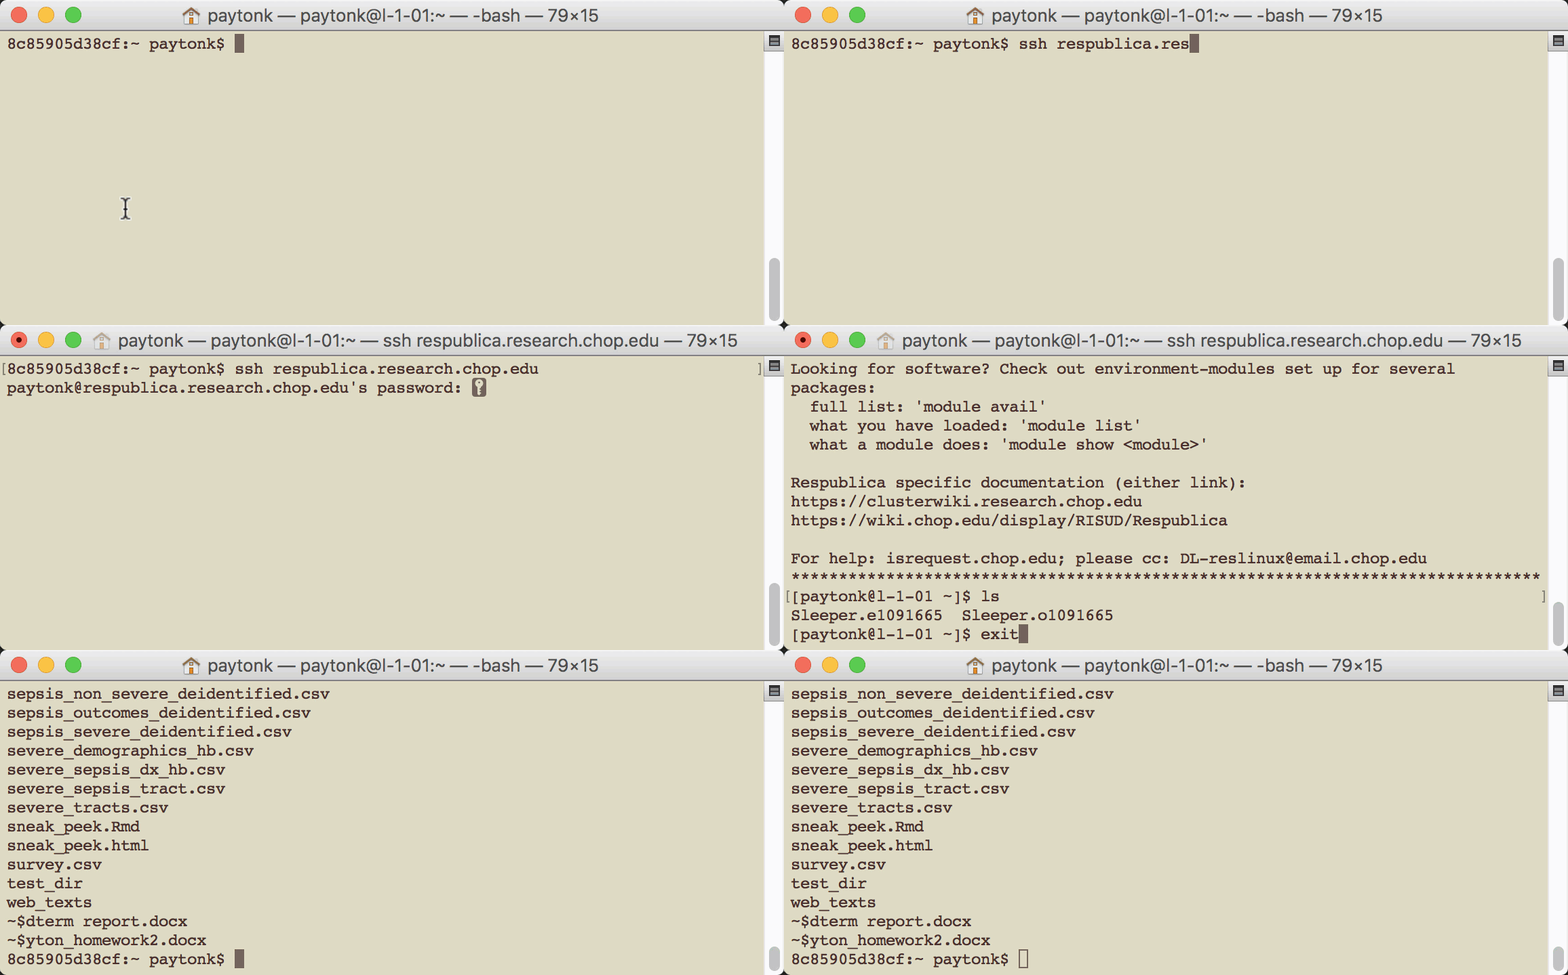
Let’s say I am using the Mac Terminal program to connect to a remote machine at CHOP. I will open Terminal and type the command ssh [the server name] to begin. Terminal remembers my user name, so I don’t have to type that in, but I will have to type my password. In the below graphic, I ssh into CHOP’s respublica server, take a look around using ls, exit the connection, and then issue ls again, now that I’m back into my own computer:

Of course, if you’re just using Terminal in Mac (look in Applications/Utilities to find it), you don’t have to ssh anywhere, you can issue Linux commands locally.
None of the commands I’m going to ask you to do can hurt anything – they are only “looking around” commands, not anything dangerous.
- You can find out where you are in a computer directory structure by typing
pwd, which stands for “present working directory”. Go ahead and try it! - You can list the files of your current directory by typing
ls. Go ahead and try it. If you’re in a directory with lots of files, they’ll stream by really fast and you’ll only see the end of the list in your screen. - When you see a lot of output, you can “scroll” through the output (whether it’s output from
lsor something else) by “piping” the output into themorecommand. Typels | more. If you have more than a screen’s worth of output (lots of files), you’ll see a colon at the bottom that invites you to hit enter to see more. Keep hitting enter to scroll down through the entire list. Bored and want to get out of the list before you get to the bottom? Typeqto quit. In fact, any time you see a colon instead of a prompt, you can usually typeqto finish up and get back to a regular prompt. - You can change directories to the parent directory of where you currently are by typing
cd ... If you’re in a directory that doesn’t have any files in it, try going up a level to list the files and directories in your parent directory. If you’re at the top of the directory structure already, nothing will happen, it’ll just keep you where you are. - Let’s try adding some parameters to the
lscommand. Typels -l, which says “list files, long format”. You should see lots more information about your files, including ownership information, last date modified, and file size. - You can also string together multiple parameters. Let’s say you want to see the file sizes rounded in “human” terms, like “1.8M” instead of “1854862”. To do that, type
ls -lh, orls -hl, orls -h -lorls -l -h. The order doesn’t matter, and you can stick the “long” and “human-readable” flags together, or leave them separate. - Sometimes, depending on your role, you might change your user (really this is just for superusers). You might want to know who the computer thinks you are, to keep track of who you’re logged in as. Type
whoami. - If you need more instructions about how to use a command, you can use the “manual”, or
mancommand. Typeman whoamito get a textual description of how to use this command. Once you’ve read it, typeqto quit the manual and get back to your prompt. - One great aspect of bash is that it will remember what you’ve done in your session. Use the up and down cursor keys to get your last few commands (maybe an
lscommand?) and hit the enter key to send that command again. - Once you’re all done you can type
exitand close your terminal emulator.
That wasn’t so scary, right?
Getting Started – Step 2
When you’re ready to try something a little more adventuresome, you can do the following. While these are not dangerous per se, they do require a bit more attention to keep from messing up and leaving an abandoned file somewhere!
- Open a terminal emulator and, if you’re working remotely, ssh into the server you want to work with. When you ssh into a remote server, you’re automatically going to land in your “home” directory. Or, if you’re working locally on your Mac, you’ll also generally go into your /Users/[your user name] directory.
- Make a new directory by typing
mkdir my_fake_directory(or whatever you want the name to be!) - Go into that directory by typing
cd my_fake_directory. In fact, just typecd my_fake_and hit the tab key. Autocomplete will find the best match (I’m going to assume you don’t have more than one file or directory that starts that way), which allows you to just hit enter. Don’t worry if bash appends a slash to the end, that’s perfectly okay. - Now you can create a new file by typing the following:
echo "abc123" > my_new_file.txt. Theechocommand says “give me as output what I’m about to give you.” The>symbol says “take the output from that last thing and dump it into this destination”. - You can see your file by typing
cat my_new_file.txt. - List the files in your directory. You remember how, right? Do you see your new file? How big is it? (Hint, you’ll need the
-lparameter to know the answer to that question.) - Make a copy of your new file by typing
cp my_new_file.txt my_new_file_backup.txt. - Now list your files again… do you see the backup?
- Time to delete some files. Type
rm my_new_file.txtand then list your files. Any changes? - Delete your backup file as well. I’m sure you can figure out how!
- Now go up one directory by typing
cd ... This is where you began! - Now it’s time to delete your fake directory. Type
rm my_fake_directory. - Did you get an error, like “… is a directory”? When deleting a directory, you need to account for the fact that there may be files inside that directory (in your case, that’s not true). That means performing a “recursive” delete, where we delete not just the directory, but everything inside it. You’ll need to type
rm -r my_fake_directoryto allow you to do a recursive delete.
That was a little more intimidating, because you were deleting files, but you’ve learned a few more commands!
Learning More
The best way to work with Linux is to practice, hopefully with the guidance of someone who already has some experience doing the same kind of work as you’re doing. Be careful with commands you don’t recognize or have side effects that could be dangerous, like removing files with rm or starting or stopping services. Want to learn more commands? The easiest way to do this is to simply Google “Linux cheat sheet”. You’ll find many handy printable guides, each with its own flavor. Print out a couple and see which one works best for what you need to do.
Stay tuned for more articles on using the command line. This is a great way to get more control over your computer’s processes, and it’s not as hard as it might seem at first!
